Showing posts with label sewing. Show all posts

Wednesday, July 27, 2016

Carnival in Köln

My blog (and my sewing) has been neglected for awhile. This, because last year I finished and defended my thesis and moved to another country. Again. This post has been due for a long time, but better late than never... right?

Now, in Köln (I know it's Cologne in English, but I prefer the original name), they have this thing called carnival. And of course I got very excited about all the dress options...

My first plan was to dress up as Elsa from Frozen. I had pretty much everything except the fabric. Then, I realized at some point that the dress is too complicated for me to do in a short time and also I still had  A LOT to do in my apartment after the move. Which really was the issue here. Because no sewing happened before there was enough space. And the desk that I've used for sewing and have assembled many times, did not want to cooperate this time, so, yeah, delays.

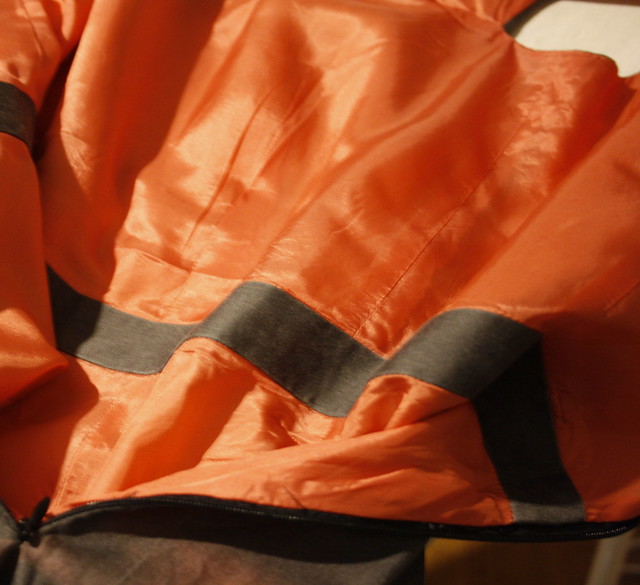
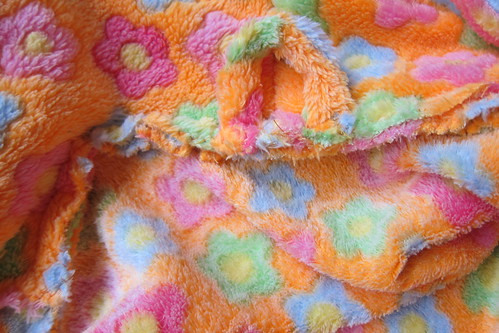
This picture doesn't show much armpit curve.
Anyways, the sewing. So, as I was running out of time and also was told that the dress might be ruined in a carnival setting, I decided to opt for a simple solution: Princess Leia's robe in the first movie. I found instructions (for the pattern and the assembly) in the internet that were simple and yet had the effect I wanted. I also found cheap fabric, which I was a bit worried about, since it was quite slippery, but I really didn't want to spend that much money on this. And since the way the dress was done, it required quite a lot of fabric (8m), I was happy I found it at 2,95 €/m. It was kind of shiny polyester, so it's not super accurate, but ok, because carnival. I also decided to omit the belt and use something I already have, because time & money.

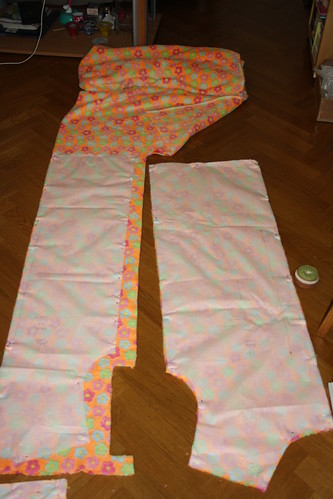
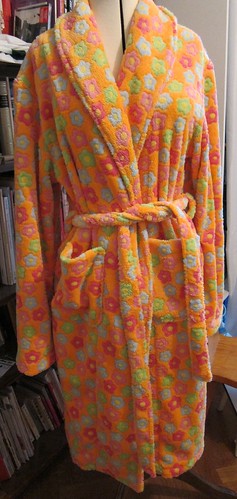
Well, I made a first version and lost faith. Somehow this wasn't working for me. So, I fiddled with the muslin and I was sort of ok with the version that I ended up with. I just basically straightened the curve in the armpit. I decided to make a collar from scratch. I found a blog post where they illustrated very clearly how to do this. I also realized (luckily before I actually cut anything) that there is a problem with the neckline in the instructions I was following: it was the same in the front and back. So, I decided to fix this as well. And I decided to cut & sew the dress first and then worry about the collar and hood.

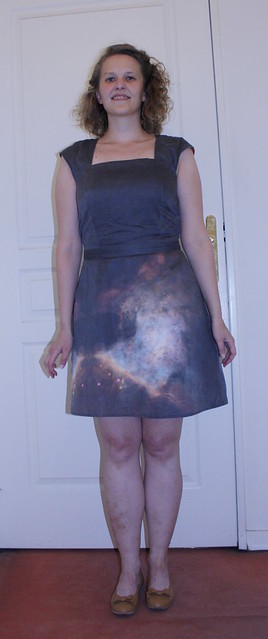
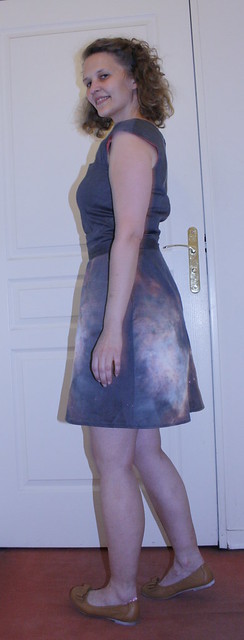
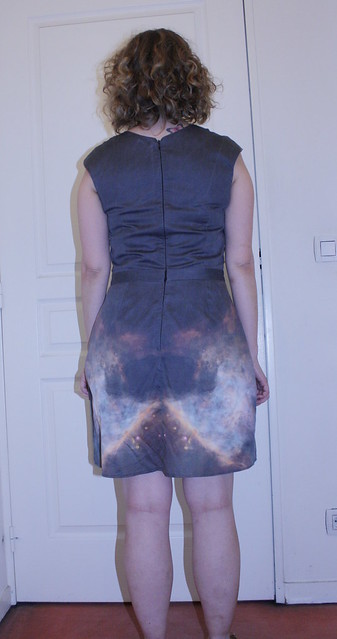
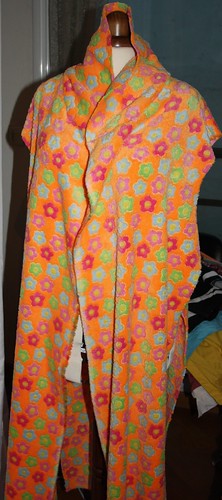
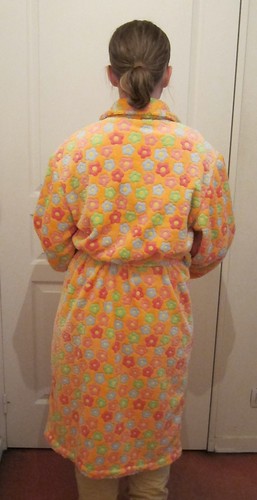
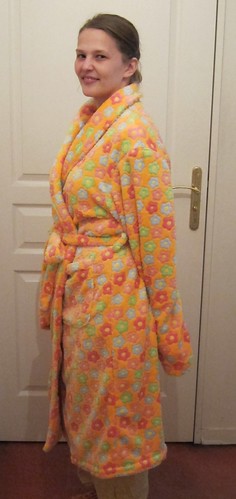
In the end the pattern worked pretty well. The dress was fairly heavy and it was good my belt was quite hefty. The design was really simple and I was happy with in the end, but the cheap fabric ended up biting me in the behind... For some reason the needle didn't always go through it properly and also I was sewing and noticed the thread isn't really attached... I guess I would've needed a bigger needle, but of course since I was sewing this the last night before carnival I couldn't go buy one and I didn't have any at home... But the slipperyness (this is probably not a word...) turned out not to be a problem. It did end up pulling at the seams though, which was made slightly less by vigorous ironing... NEVER EVER GO FOR THE CHEAP FABRIC!!!

I actually don't have super good pictures of the costume, cause I forgot to take some. Well, I was busy getting ready and then tired... That's carnival for you. But overall it was a good costume. I added black boots and filled my hair with pantyhose to get a fuller look (yes, I know it still looks ridiculously small...). A wig might've been nice, but I didn't want to wear one for the carnival, I thought my own hair was more comfortable. I would say, this was an ok go for my first ever costume, but next time, I will choose better fabric and also hopefully have more time. But the end quality was ok enough for carnival. I tried to crop people out of the pictures so that no one will get there photo to the internet who doesn't want that to happen...


------------------------------------------------------------------------------------------------------

The Stitchy Details:

  • Challenge Theme: No challenge, carnival
  • Pattern used: Drawn by me with the help of instructions
  • Fabric: Cheap white polyester
  • Notions: -
  • Did you make any pattern alterations or design changes? Yes, well, since I basically drew the pattern myself...
  • Total price: 28,55 €
  • Time to complete: Didn't actually keep tabs on this, so I have no accurate guess.... something like 15-20h... I know I sew the last night until 5am...


Sunday, November 30, 2014

Game Night dress

The Stitchy Details:

  • Challenge Theme: No challenge, Game Night party in Herräng
  • Pattern used: La Sylphide by Papercut Patterns
  • Fabric: Shiny sateen with playing card suit images + red sateen
  • Notions: Self-covered buttons
  • Did you make any pattern alterations or design changes? No
  • Total price: ~37 €
  • Time to complete: ~15 h (very much an estimate, as I was in a hurry and didn't really make statistics on the time...)

------------------------------------------------------------------------------------------------------

So, this dress... I had this idea for the dress for the Game Night party at Herräng Dance Camp. And of course I started too late. As always. As you can see from the picture, I actually did wear it to the party (I didn't have anything else, mind), but I'm very skeptical that I will ever wear it again.

First, I was in a hurry and I did a muslin,  but I didn't really had time to alter anything and it wasn't half bad... Then, the sleeves. I really should've made them longer. With this fabric and my arms they just look weird. Also, the red, although a good idea, with this pattern, the whole dress just reminds me of a robe that Hugh Hefner might've worn. All in all I really didn't spend enough time with this. The rolled hem is in not really up to closer inspection either.

The buttons did turn out pretty well, and I will definitely use those again for other dresses. But also, it's good there is no zoom to the buttons as they are not straight in line... I'm also wondering about the whole pattern. I really liked what others have done with it, but maybe it's just not the pattern for me. Although I might try with shorter sleeves and omitting the bow. The fabric was cheap, however, and the scraps are usable for my lingerie projects.

We'll see, I wasn't really over the moon about this. Which is sad as I've looked at the Papercut designs and I love them. I might try this as a shirt version like Lauren did. I might try to fit this better too. I have a similar body shape to Lauren's and she has made the top part a lot more fitting than what's in the original pattern. That might work for me too. I won't throw the pattern away yet, but it might take awhile for me to return to it. And I will need to improve my alteration skills. Maybe this would be a good project for that :)

The party was fun, however, so it was not a total loss. Notice also the matching shoe laces. And I have improved in my hair skills as well since then (also longer hair helps). This was awhile ago, as the party was in the beginning of August. Such is life for a PhD student. I hope to have a bit more time to sew, but I'm not really stressing about it :)

Friday, July 11, 2014

Orion Bar dress

The Stitchy Details:

  • Challenge Theme: Monthly Stitch - June 2014
  • Pattern used: Sewaholic Cambie
  • Fabric: Black and Orion Bar fabric ordered from Spoonflower + salmon colored bemberg lining
  • Notions: zipper
  • Did you make any pattern alterations or design changes? I used a size 8 but the shoulders and darts from size 6. Also I took out ~10 cm of the length. And straightened the neckline with Tasia's instructions.
  • Total price: ~106 € (Spoonflower fabric is fairly expensive, especially with postage to Europe...)
  • Time to complete: ~22h

---------------------------------------------------------------------------------------------------------------
Orion Bar dress - goofing Well, I'm a bit late, since it's July, but I actually finished this in June (30th, to be exact!), but I didn't have time to take photos or blog it as I had a presentation on July 1st. And I actually was finishing the dress for the presentation. The Cambie has been on my list of to-sew for a long time now. There are really awesome ones in the internet and I've been very inspired by many (few examples: Les Mademoiselles: love the piping! Scruffy Badger: the edges on the blue one, so cute! Young Seamstress: just plain lovely, Sewing in the Rain: so classy and I just love the color...)

Actually it was the blogpost of Sewing in the Rain, that gave me good advice when choosing the size. She said that she should have chosen the size according to her full bust instead of the actual bust. I did that now, I actually would be pretty much size 8 (except way shorter) according to the sizing chart. But my problem is that I have super narrow shoulders (as in my upper body is kind of small, and then there are the boobs, if that makes sense...).  So I chose size 6 for the neckline and shoulders and this was the best choice ever! The shoulders fit perfectly and then I just draw to the waist for size 8. I didn't do an FBA (I actually have never done this and I was glad I didn't have to learn it now, as my schedule was kind of tight), I just added a bit to the side seams, but I didn't need much to fit. But there are some problems with the fit. Actually I think I should've done the FBA: there's some wrinkling under the bust, but the front doesn't look too bad. The back, however, is too big as you can see from the back and side photos. So I think the added length did a lot for the bust, but as I added it to the back as well... not so good. So, fitting will require some work next time. Because there will be a next time for this dress :) Maybe with a fuller skirt... Or maybe I'll make this same one, but better.

Orion Bar dress - front Orion Bar dress - side Orion Bar dress - back
I had a bit of trouble attaching the lining. There is a pretty good tutorial on the Sewaholic blog, but still had some problems... I wasn't sure when to sew the lining under the zipper, so in the end I did it before attaching the lining. Now then, I was reading the comments on the post and someone was asking about trimming the seam allowance from the center back of the lining and it was advised to trim it off completely. I didn't trim it off completely, but I still run into problems, and actually with the method Tasia is using, you really don't need to trim the seam allowance at all for the lining before attaching it.

Orion Bar dress - seam finish
Finished seams :)
I got a bit carried away with this dress as this was the first time I used my pinking shears and I loved it as a way to finish the seams. Especially since most of the seams are not exposed anyway, but under the lining, they don't need a whole lot of finishing, but I feel uncomfortable of leaving them totally unfinished. I'm in love! I also used the glue pen to attach the zipper for sewing and it worked pretty well. Lot less hassle than pins. I might really adopt this method in the future as well (this was Stuart Hillard's advice in the Birmingham craft fair).

Orion Bar dress - lining All in all I think the result was successful. I love the salmon colored lining (not looking like the right color, I'm still photography-challenged), and the dress was a big hit at our Journée des Thésards (PhD student day), where we were supposed to dress up as our research subjects... Yes, the picture in the fabric is of the Hubble image of the Orion Bar (photo credit: NASA, C.R. O'Dell and S.K.Wong (Rice University)), which is what I study at the moment :)

Wednesday, July 2, 2014

Back into sewing: Tractor shirt for my nephew

Just a quick update about something I did for someone else for a change, as I haven't been sewing a whole lot. I bought this fabric from the craft fair in Birmingham, if you remember. When I saw it, I knew my nephew would love it, due to his love of tractors.
I used the Maxwell Top pattern. The sizing was a bit weird. Well, I knew my nephew is skinny, so I did ask my sister to measure him. When the chest size corresponded to a size for a 3-year-old, I asked her to measure the length too... So, I took the 3-year-old size, but the length of a 7-year-old...

So, when I visited my sister in the beginning of June, I had a shirt. I didn't have buttons so I used snaps, and sewed them on the last day of the visit... The boy tried the shirt on for the fit, but was too fast (it was a hot day and he wanted to go play in the water outside), so I only have a blurred picture of him in it (hadn't adjusted the settings of my camera to inside...). But I do have a picture of the shirt that turned out well.
Stay tuned for a new dress update! It's coming soon, I just need some photos...

Saturday, April 19, 2014

My first new bathrobe in ~25 years!


The frontThe Stitchy Details:

  • Challenge Theme: HabitRPG - UFO challenge
  • Pattern used: Jalie 2567
  • Fabric: Velour éponge
  • Notions: -
  • Did you make any pattern alterations or design changes? Added a loop for hanging 
  • Total price: 60 €
  • Time to complete: 13h

-------------------------------------------------------------------

I really wanted/needed a new bathrobe. I gave my old one away when I moved, because I wanted to have extra incentive for making a new one. The old one was really old. My mom bought it for me when I was a kid, so in the end of 80s... It was ok, but started to be not so comfortable as it was quite stiff from all the washing over the years.

I decided to do this for a challenge as well. In April, I joined the site called HabitRPG. This has improved my efficiency so much! I can make my life a game and all the annoying tasks give me rewards :) And I of course joined a sewing guild. And the April challenge is a UFO challenge. Which this one qualifies as I had started to trace the pattern...

CuttingThis was an easy project to get back into sewing. With all the stuff with the move and traveling for work, I haven't had much time to sew and starting with something I need to really fit, was daunting. This was great as it doesn't really need to fit, just be big enough.

My leg
The fluff was everywhere
Well, I started cutting the fabric and suddenly me and my whole room was covered in little fluff... The fabric is something called velour éponge, I have no idea what that is in English (or in Finnish), but it was pretty much the perfect bathrobe fabric.

2014-04-12 20.39.12Well, I didn't let that bother me too much and once I actually started sewing this was less of a problem. This was the first time I actually really used my dress form! Who I named Jane, by the way (because that was the first name that came up when I thought about this and hey: Jane Austen). I didn't really need a lot of fitting, but it was reassuring to measure things against the form and pin stuff in place.

Added loop for hangingThere are little details that I could've done better, but I think the skills only come with time and practice. I added a little loop in the middle inside, so that I can hang my robe in the bathroom. The sleeves are a bit long, but I did notice this in the construction stage and decided to keep them long, as if it's cold I can pull my hands inside. so that is intentional. All in all, I think this turned out very wearable.
Jane in bathrobeThe backThe side

Wednesday, March 12, 2014

My plan for the rest of the year

So, I've been doing everything else but sewing, and even though I don't want to stress about it, I really want to get better at it. So, I decided to make a plan for this year. Nothing too ambitious, because then when I can't keep up, I end up giving up altogether. So, my goal is to make at least 6 garments this year. I still have like 9 months to go, so I think this is reasonable even if I get some slumps sometimes.

My planned pieces are:

1) Bathrobe
This I've actually started: I have traced most of the pattern pieces. What's great about this project is, that I won't have fitting issues as it doesn't really have to fit. I mean I have to fit inside it, but when I lived at home I used my dad's old bathrobe a lot because it was so nice and soft. So, it really can't be too big... I found a really nice fabric from SelfTissus, unfortunately they only have solid colors now, but here's a picture that used to be on the site. As a pattern I'm using Jalie 2567.
Bathrobe fabric
Jalie 2567
2) Vintage dress
This I've also started, but I got nervous about the fitting part... So, this is actually what I planned for my last year's Monthly Stitch challenge for September. But then things happened and I just didn't have time to finish. I have traced the pattern and even cut and marked the muslin. So, I need to start the fitting process. I have an idea how to do this, Craftsy is really helping me in understanding how it's done. It's so much different to actually see how the fitting is done, than trying to figure it out from a book.

I'm still planning on the same fabric as originally, and I'm doing the short sleeve version. If the final dress fits and otherwise succeeds, I will do a long sleeved version from a petrol blue wool I bought from sale last year (3m/15€, pure wool!).

3) Renfrew
I've been planning to make a renfrew top for a long time. I'm a bit nervous about sewing with knits but I just have to start somewhere. I'm thinking of starting with a short sleeved version in this as well. I have a perfect amanita fabric (I just learned what that red mushroom is in English), although it is more turquoise than in the picture here. If I like how it turns out, then I will make another version (maybe a long sleeved one) from this cutest monkey fabric ever! Second one should be quite easy to make if the first one is good, right?
Monkey fabric for renfrew no 2
Amanita fabric for renfrew no 1


4) Cambie
This is something I need to finish before it's time to defend my thesis. Well, there's still about 1,5 years until that time, but at the rate I'm going, it will com up fast. Well, I might want to use the cambie before that, but I think I can still wear it for my defense. And why is this a perfect dress for that? It's that because of the fabric, which I "designed" and ordered from Spoonflower. So the quote marks are there, because I just basically took this super pretty Hubble image of the Orion bar, and then just chose how it's featured in the fabric. I also ordered some basic black (which is not quite black as the printed fabric will never be quite that, but it will match the picture fabric black) and I will use that for the bodice and then the Orion bar will be on the skirt part. And I chose this particular picture, because this is the area I'm currently researching. I'm kind of excited about this! Yes I know, I'm a geek.
Credit: NASA, C.R. O'Dell and S.K. Wong (Rice University)
5) Swing dress
This is something I actually started way back and got stuck with the fitting... There seems to be a pattern here... (pun not intended). So I just had started swing dancing and lost my heart and then I got the pattern. This was also the time I got interested in sewing again and there was Casey's sew-a-long from where I found the pattern. I traced the patterns cut the muslin and it's been at that stage for couple of years now... I really like the look of it, I have a pretty brown fabric with some print fabric for contrast and I just want to get it done!

6) Tofino pants
Well, it really depends how long can I make my tofino pants, they might be more like shorts: I only have 1 yrd of the fabric. It was all that was left, but hey, it's dinosaurs, so I really had to get it anyway. And I'll make shorts if it's not long enough for pants... If it was normal width I probably could squeeze pants out of it, but the width is just 106 cm. But don't you think it's cute? I can't wait to wear my pyjama bottoms!
Dinosaur fabric for pyjama pants
Well, the actual projects might change, but this is what I'm planning now. And anyway the goal is to finish at least 6 garments, I'm not being too strict about these being the actual 6. In general I'd like to have more blouses, and now I realized there's not a single blouse on my plan... So, that might change. And I can of course make more than 6 if I can. I'm just super slow with my sewing, and I like to try not to cut corners, because then the clothes are more wearable.

I also have some knitting projects and next weekend I'm doing something quite exciting! I will post about it next week, so you will have to live in suspense until then. Oh, and what did I notice on the weekend? The second series of the Sewing Bee is on! And I can watch it on tv as I'm in UK for awhile. How cool is that!

Sunday, March 9, 2014

Slow beginning of 2014...

So, life has been crazy for me. Lot of traveling, both for work and for fun and I've been somewhat sick most of this year. Nothing super serious, but I did break some ribs from coughing... In any case, I haven't really felt the urge to pick up a project. Last year I did do a skirt for my niece/goddaughter for her birthday. It's basically the same circle skirt I did for myself, but it has a elastic band as a waist.
The skirt - ready to be sent
What was actually better than the skirt: yes you guessed it - the bubblewrap...
For myself, I haven't really done anything. And now I'm in UK for a month, so no sewing machine... But I took some knitting with me, we'll see how much I get done. I have a sweater I started long time ago and it's basically just missing one sleeve. I wanted already to finish it, but realized I didn't have all the yarn with me in France. So my mother found the rest and brought them when my parents came to Paris. I have no idea how it ends up fitting, I got the Sweater Surgery class from Craftsy just in case.

I also took yarn for another sweater, which I'm planning a bit better with the help of another Craftsy course: Knit to Flatter (Can you see the addiction here? But I love just watching the courses, even if takes me a long time to actually use the knowledge...). Hopefully I have time to at least start that.

My scarf
The new yarn
Yesterday I went to a local Hobbycraft store in Milton Keynes. I ended up spending £50 for odds and ends. Well, I have this scarf that I love a lot, a friend made it for me. And I saw similar yarn it was made from and decided I'd like another one :) This might wait until I'm back in Paris, though.

I also found something interesting I hadn't seen before and as it wasn't super expensive, I thought I want to try... It's a knitting loom. I like leg warmers a lot and decided to try how it would be like to knit them with a loom... I basically just need basic rib stitch, so it's should be fairly easy. There's a booklet, though so the loom comes with instructions for socks, but it uses the same size heel for all the sizes, which I find a bit strange. But there seems to be a lot of information in the net (what a surprise) about loom knitting, so I should be fine.
Knitting loom and the yarn for legwarmers
So, hopefully I have something finished soon. Sewing will have to wait until I'm back in Paris, but I have some ideas (+ few things I've started). Hope my life will be a bit less crazy for a while...

Sunday, September 15, 2013

Bombshell swimsuit --- or I'm always out of season

The Stitchy Details:
Bombshell Swimsuit
  • Challenge Theme: Originally: Swimalong 2013, tried: Défi vintage - Thread and Needles: Plage (Août 2013), but missed both deadlines...
  • Pattern used: Bombshell swimsuit
  • Fabric: Turquoise lycra with red dots and swimsuit lining from Spandex House (love the selection, but the postage was huge!) 
  • Notions: Swimsuit elastic, cups (swim proofed)
  • Did you make any pattern alterations or design changes? I made the size 10 of the view A of the pattern and added some seam allowances to waist and hips, since my measurements were slightly bigger on those parts.
  • First worn/Wear again? For the pictures. It's not really swimsuit weather in Paris anymore... Maybe in Qatar in November if there's a place to swim.
  • Total price: ~75 €, most of this came from the fabric, because the shipping costs were almost the same as the price of the fabric. And also I ended up buying 2 patterns for this...
  • Time to complete: 16h

---------------------------------------------------------------------------------------------------------------
Taping the pattern...
So, remember when I wanted to make a swimsuit in June? Well, I didn't abandon the plan, but I needed to pluck some courage to actually make it. And also, I tried way too many challenges at the same time. I thought I had time, but then, I have other things in my life too. Like work. That really cuts on my sewing time... Anyway, I have finally joined the wonderful group of sewing ladies who have pictures of their butt in the internet. The things sewing makes you do...

I actually had another pattern at first, as you might remember, but when the bombshell suit came along and there was no need for zipper like in the other pattern, I decided to go for it instead. Also, seeing so many awesome examples around, I just couldn't help. But, I didn't make the deadline. I mean, that was end of June and now it's September... I thought I would make it to the Thread and Needles vintage challenge for August with a theme: beach, but hey, I missed that deadline too... But, I finished the suit and finally I have a new swimsuit! That covers my butt and my stomach! I haven't seen bad versions of this swimsuit or unflattering ones either. I think this is one of those garments that look great on everybody!

I was a bit nervous, since I haven't really sewn anything stretchy before. Well I have, but I've always had a serger and now I just have my sewing machine, since the serger is my mother's and lives with her and of course at school I used the school's serger. But the pattern said, you only need a sewing machine and I have been watching a craftsy course about sewing knits without a serger, so I was sure it's doable.

Cutting, first time using weights :)
Well, I had some problems with cutting. I think my mistake was trying to use the rotary cutter. I think the idea of the rotary cutter is a good one, but mine is kind of dull at the moment, so it didn't give me a clean cut. Also, with back I forgot to grade the pattern to my waist and hips, so I had to cut that again... Luckily I have more than enough of fabric. Even with my screw-ups I think I have enough for another swimsuit. Well for a bikini anyways.

I decided to do this one right, although I wasn't really into making a muslin (and I haven't really read anyone making alterations), so that part I skipped. But I decided to hand baste my ruched pieces together since gathering and machine stitching with pins doesn't really sound like something that would work well if I do it... (also I was in the middle of a 2-part episode of Star Trek, TOS, so this way I could keep watching...).

Still a big mess...
I lost my faith so many times doing this... Mostly because I haven't sewn anything with a stretchy fabric before and I was so afraid that everything would turn out horribly wrong. I had some trouble with my added seam allowances. I didn't realize that I put them in the center seam in the back (yes, as it is pointed out in the instructions: the curved seam is the center back!!!). So I had to adjust the leg openings a little. I sometimes found the instructions a bit confusing, but then in the end I was just following the sew-along posts. And those instructions rock!

Bombshell SwimsuitThe hardest part however was the top part. It took forever for me to get those cups in place and I still think I sewed them on too low. Also, I'm wondering if I should've taken the smaller size I was debating about while I bought these. But I think the biggest problem is the shape. Although I'm not against the whole bullet style in general, it is the style favored in the 50s, but these are really hard, while the 50s style would come because the didn't have underwires and the bra's were made of fabric without any shaping material. Also, I distorted the top while I sew the elastic on and it's too big and the elastic is not holding anything. I did fix it a bit with the straps, so I think it looks ok in the pictures, but I'm not really happy with the top part.

Bombshell SwimsuitAll in all, I'm not over the moon about it, but as for it being my first swimsuit it's ok. The pattern is amazing, although I think I didn't need the extra I added for the seams (or I could've stretched the elastic a bit more), I could've gone for a bit more tighter fit, which is what I like when it comes to swimsuits. The style is very flattering, but I think next time I try to find cups that are less pointy and more comfortable. Lauren used a trifted bikini and ripped the cups off that, which might be a solution. But I think for my first swimsuit this is very presentable. And I was a bit worried about taking photos, you know, in my swimsuit, in the backyard parking lot 7:30 pm, when it's 15 degrees outside... The lighting could've been a bit better, but yes, my legs really are quite white. But no one walked by and it wasn't as cold as I thought. And I got my pictures from the first set of 10, so that helps. And see: I'm wearing heels...! I think they were the only suitable footwear with this suit :)

Tuesday, August 6, 2013

Finding the fit

I need to talk about fitting. This is the main reason I started sewing. I hate the way RTW clothes just don't look that great on me. And I'm not big on fixing, although I'm trying... The obsession with the fit is not that unusual given my family. My mom has always brought this up while buying clothes, which is why I love to go shopping with her: I can just try stuff on and she doesn't care about the style but the fit, style I can choose. She got it from home too. My grandparents were quite particular about it. Especially my grandmother, she would never wear anything that didn't fit just right or wasn't ironed.

This is what has always troubled me with sewing. I mean, I learned sewing in school, but I learned the sewing technique, I never learned to fit anything. And as long as you're still a girl, it's ok, it wasn't so important, since you don't really have boobs or a butt, but once those came along, the fit became an issue. So, now, I'm really investing on that. I know I can sew (not that I don't have room for improvement there as well), but I also want to make sure that if I'm really taking the time to make my own clothes that they will also fit and look great on me.

I heart Craftsy! So: Craftsy. I'm a bit addicted actually. But I like just watching the courses... I started a couple of fitting courses and while I like Sew the Perfect Fit by Lynda Maynard a lot, I'm not sure if I'm learning to tackle any kind of fitting issue, although it is very comprehensive and I haven't watched it all the way through. I do think it's worth the money, though. Another one I started watching is specifically about pants: Pant Fitting Techniques by Sandra Betzina. One can clearly see that she has a lot of experience and knowledge, but I think the course could use a bit of organization. She also makes all the different adjustments to the same pattern piece, which makes it a bit confusing. And it suffers just about a general lack of planning. I'm still watching it though, because there is a lot of good information, but I think I might need to watch it few times to actually understand.

But then, I came across a new Craftsy course: Fast-Track Fitting by Joi Mahon. First time fitting really made sense to me. The idea is that the changes are made to the pattern according to your measurements before making a muslin. This way, the muslin needs only a bit of tweaking. And this course was definitely planned well. It was always clear which adjustment she was doing and where. Only small annoyance for me was the way she pronounced "measure", but hey, that's nothing really. I haven't actually applied any of this yet, but I will soon. I think I will even tackle my disastrous Pastille again and see if this method makes it ok. I really didn't know what to do with the muslin fitting, it was just such a weird fit. I've heard similar things about the new Hawthorn, so I think I will try my Colette book patterns first and then decide if I want to try their other patterns.


Sunday, June 23, 2013

Pyjama Party!
— or The Importance of a Muslin

Well, I thought I would have a chance to finish one of my sewing challenges on time. I hadn't done anything to the pyjama bottoms, but I thought that they're not that hard, so I will just sew them up today. I had a pattern and everything.
My lovely dinosaur fabric :)
Simplicity 3696 The pattern I was going to use


The first thing I noticed was that I actually don't have the elastic for the waist. Then I thought, I'll just sew them up and buy elastic next week and add that, so problem solved. So, on to making a muslin. For my measurements I was a size M, but looking at the finished garment measurements I decided to go with S as I like my clothes bit more fitted even when it comes to pyjamas. The muslin was quick and easy (even the patch went over well: my sheet wasn't wide enough for both front and back pieces, so I added a bit of fabric to the missing part and it wasn't pretty, but hey, it's a muslin). But then I tried it on. I noticed right away that I could use the whole 1.5 cm seam allowance instead of 1 cm I was using on the muslin, since the pants were quite big enough. BUT: the front of the pants seemed huge while the back seems a bit tight. And I don't think my bottom is that big... I've heard it's one of the problems with big 4 patterns.

So no pants for today. I love my dinosaur fabric that I was going to use and I will get the Tofino pattern and try if that would be any better for me. Although I think I will play with the muslin, if I can figure out how to make them better. And if I can't, well, that's why you make muslins, right?

I'm just a bit annoyed, since I haven't been on schedule for any of the challenges I wanted to do. I was right on track to begin with, but then work happened. And I have this article I need to finish that's about my Master's thesis, that I should really have finished already and that I have to do on my own time. So, I feel a bit guilty even thinking of sewing... But I'm almost done with that, and work is less crazy now, so more sewing :) Although I will be away for most of July... But I have about a week before that: I will get something done, some refashioning at least, and when I'll be back, I have so many plans...

Friday, June 7, 2013

#sewingdares

So, what's happening on twitter...? You can get your very own sewing dare! Basically the idea is that someone else challenges you to sew something you haven't done or are a bit afraid to try. Or think you dislike, but kind of need. It's all about fun and not stress and after reading about this from Gillian's blog, I decided I wanted one. I mean in addition to all the challenges I'm doing and being late with...

So, when I asked for a challenge, Clare from Sew Dixie Lou suggested I make a circle skirt for dancing. And Gillian suggested I sew one of my Sewaholic patterns. So, I decided I'd take them both up for a challenge. I have already bought a fabric that I thought I'd use for the Cambie dress and I have an idea about Thurlow trousers as well, I actually have some fabric that could be used for the shorts version. So, we'll see which one I tackle first. I also have knit fabric I thought I'd use for a Renfrew top.

My knit from Spoonflower
The Cambie dress fabric deserves a few words. I actually "designed" some of my own fabric with Spoonflower. I didn't really read all the instructions and just uploaded the picture and considering that, it turned out pretty amazing. I'm not sure about the fabric quality, I did order a knit fabric at the same time and it seems a bit more high quality than the cotton sateen. Basically I uploaded this Hubble image of the Orion Bar and made it a fabric:
Star Factory at the Center of the Orion Nebula
Credit: NASA, C.R. O'Dell and S.K. Wong (Rice University)

And why is this picture so special? Because this is what I study: The Orion Bar, the bar-like structure which you can see on the bottom left in the picture. Or that and the area towards the stars that can be seen in the middle of the picture. The awesome thing would be to make the dress for my thesis defense, but that will be like in 2 years. So, I think I will make this sooner. It can always be my presentation dress. The black looks a bit greyish, it's not so bad in this, but the black I ordered is worse, because the whole fabric is the same color. But I wanted the matching fabric since I thought I would only make the skirt part of this picture fabric. So, I hope I will get to this soon. I'm pretty excited to make something of this farbic! I also love the equation knit. I need to buy some color coordinating knit, though, for the hem and the cuffs. Well, there are a few choices in that fabric.

For the circle skirt I thought I would use a fabric that I just picked up from the post office yesterday:
Isn't it lovely? I think it'll make a perfect circle skirt for dancing. I kind of was thinking about dancing when buying this fabric, since Aristocats and swing sort of go together (just see Everybody Wants to be a Cat). So, I have a plan for the circle skirt as well.

Other fabrics I got with the Aristocats one was a Hello Kitty kimono crepe, which seems very slippery, but so wonderful and a dinosaur flannel, that I'm planning to use for some pyjama bottoms for the pyjama party this month. 


I mean, who doesn't love dinosaurs? Especially in pyjamas? Well, also in anything else, like in this dress by the Cation designs.

But why I'm not sewing and just planning, you ask? Well, I've been really busy with some actual life (we had Paris Lindy Exchange last weekend) and also with work. And I twisted my ankle, which kind of makes everything a bit hard. I did finish cutting all the pieces for my Réglisse today, but managed to growl in pain couple of times, since cutting fabric on the floor isn't the most ankle friendly position. And now, I don't have a sewing table or a sewing room. I have a studio and I'm lucky to have a table for the sewing machine. But, now it's cut and hopefully I will finally finish it soon. For the Great Gatsby dress, I think that will go on to the back burner for awhile. I actually could use some pyjama pants, so I will try to finish them on time for the pyjama party and I also have the SwimAlong, which I'd love to finish this month. But there will be a flapper dress. Hopefully by the end of the summer :)