Showing posts with label Papercut Patterns. Show all posts

Sunday, November 30, 2014

Game Night dress

The Stitchy Details:

  • Challenge Theme: No challenge, Game Night party in Herräng
  • Pattern used: La Sylphide by Papercut Patterns
  • Fabric: Shiny sateen with playing card suit images + red sateen
  • Notions: Self-covered buttons
  • Did you make any pattern alterations or design changes? No
  • Total price: ~37 €
  • Time to complete: ~15 h (very much an estimate, as I was in a hurry and didn't really make statistics on the time...)

------------------------------------------------------------------------------------------------------

So, this dress... I had this idea for the dress for the Game Night party at Herräng Dance Camp. And of course I started too late. As always. As you can see from the picture, I actually did wear it to the party (I didn't have anything else, mind), but I'm very skeptical that I will ever wear it again.

First, I was in a hurry and I did a muslin,  but I didn't really had time to alter anything and it wasn't half bad... Then, the sleeves. I really should've made them longer. With this fabric and my arms they just look weird. Also, the red, although a good idea, with this pattern, the whole dress just reminds me of a robe that Hugh Hefner might've worn. All in all I really didn't spend enough time with this. The rolled hem is in not really up to closer inspection either.

The buttons did turn out pretty well, and I will definitely use those again for other dresses. But also, it's good there is no zoom to the buttons as they are not straight in line... I'm also wondering about the whole pattern. I really liked what others have done with it, but maybe it's just not the pattern for me. Although I might try with shorter sleeves and omitting the bow. The fabric was cheap, however, and the scraps are usable for my lingerie projects.

We'll see, I wasn't really over the moon about this. Which is sad as I've looked at the Papercut designs and I love them. I might try this as a shirt version like Lauren did. I might try to fit this better too. I have a similar body shape to Lauren's and she has made the top part a lot more fitting than what's in the original pattern. That might work for me too. I won't throw the pattern away yet, but it might take awhile for me to return to it. And I will need to improve my alteration skills. Maybe this would be a good project for that :)

The party was fun, however, so it was not a total loss. Notice also the matching shoe laces. And I have improved in my hair skills as well since then (also longer hair helps). This was awhile ago, as the party was in the beginning of August. Such is life for a PhD student. I hope to have a bit more time to sew, but I'm not really stressing about it :)

Thursday, August 22, 2013

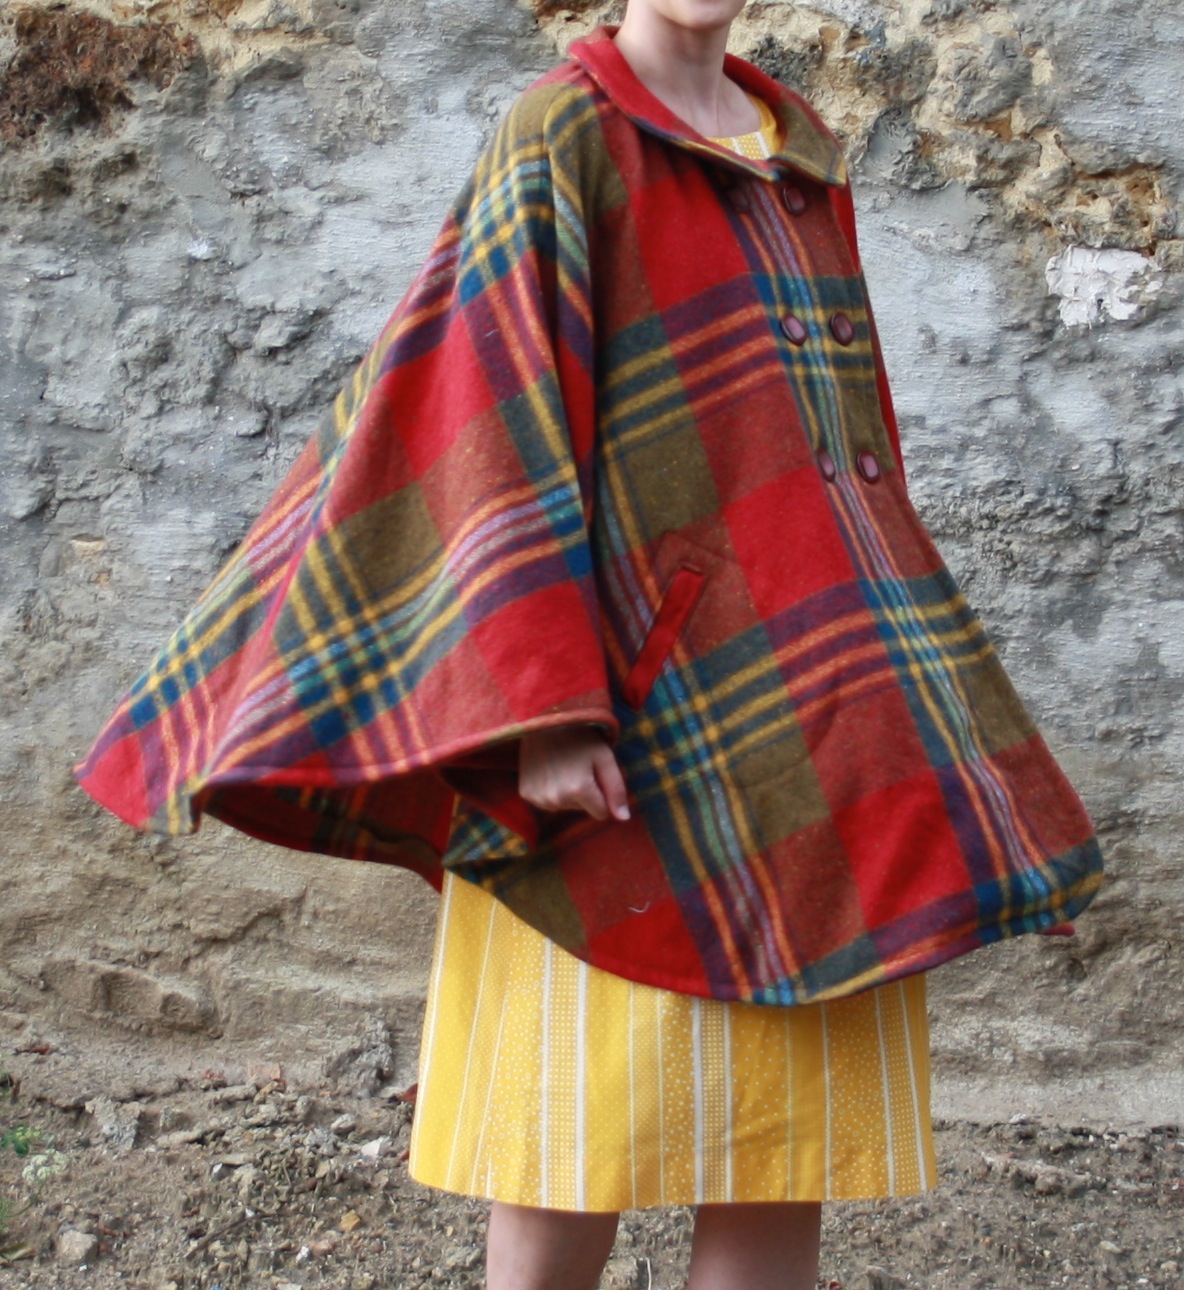
The Cape of Misfortunes

The Stitchy Details: 
  • Challenge Theme: The Cape Challenge - August 2013
  • Pattern used: Milano Cape by Papercut Patterns
    Contemporary, sizing: XXS-L (my size: S)
    Description by Papercut Patterns: Double breasted cape with six buttons, a flat Peter Pan collar, side single welt pockets and full facings.
  • Fabric: Wool, bought locally
  • Notions: 6 buttons
  • Did you make any pattern alterations or design changes?
    No changes, except the use of different fabric for the pockets (but this isn't really a change). Unless you of course count the fact that I sew one of the welts upside down.
  • First worn/Wear again?
    First worn for the pictures, this is definitely for the fall/winter. But when the cold weather comes, this will be part of my wardrobe.
  • Total price: ~36 € + pattern ~22 € = Total ~58 € (The buttons & thread is an estimation: here in France I tend to only get the bank card receipt with the total amount, so no idea what they actually cost. I estimated the cost based on internet stores).
  • Time to complete: 14h 30 min

---------------------------------------------------------------------------------------------------------------
Well, the first problem came with the welt pockets: I had totally decided to use the furniture cotton for the pockets. But when I started cutting, I noticed that the knit actually matches the color a lot better than the furniture cotton. So I decided to use the knit after all, since that was the exact right color. But I thought the pockets wouldn't be sturdy enough with the knit, after all, this is outdoor wear for winter. So, what I did was I used the knit for the welt part that shows outside and the furniture cotton for the actual pocket.

The second problem came with cutting: I noticed that I didn't have enough of fusible interfacing. I bought according to the pattern (and even a bit more, since it said 1.3m and I got 1.5), but what I didn't notice was that my fabric wasn't 140 cm wide, but 90 cm... So, some creative solutions: since this wasn't the type you need to iron on, but sew, I decided that it doesn't matter which one is the right side, since they won't show anyway. So, I cut the hem interfacing both the same way. And for the undercollar, there will be a seam in the middle. Since I totally had enough fabric, just not enough for continuous pieces.

And then: the thing I was dreading for: matching the fabric. I was going to use Tasia's method in matching plaids, but my problem (third and I haven't even cut the fabric yet) was, that I couldn't fold the fabric in half as I normally do, since the cape pieces were too big, and I couldn't do it the way it was done in the instructions (you fold the fabric the other way, so that selvedges were on the sides of the fold), because my plaids weren't symmetrical. At this point, I started to wonder if I have enough fabric to match the seams and I decided to try to match the main pieces and then match the collar and facings if possible. Well, in the end, matching wasn't that bad. I matched everything except the hem facings. But I my pieces were a bit stretched out in the process...

But: the plaid matching seemed to work pretty well, as you can see from the picture below :) Well not for the facings, but I was getting tired by then and they don't really matter as they don't show. Also, the only piece that was stretched out was one of the front pieces, so I sewed the buttons on that one, so that it was left under the other piece. And you can barely notice it.
The back seam: it's not pressed and still you can hardly see where the seam is!
The cutting actually took like 6 and a half hours... Don't do a plaid cape... But as everyone who has ever known me, might already know: I never take the easy way out. At some point I realized that the fusing actually was one with glue, just not a whole lot of it... But this really didn't become a problem. Although I might've used the iron a bit longer and not having to sew it to all the pieces.

And then, the first actual sewing thing. The thing I was dreading: the welt pockets. After the youtube tutorial I was quite confident about the sewing of it all, but I really hadn't internalized which way you place the welt, so that it will come out the right way in the end. I even searched the internet before sewing it! But the one that I found where they actually used a garment and not just pieces of fabric for show, was one where they did a bit different kind of welt. So, my first ever welt, even though it wasn't half bad, was upside down... The pocket is sewn the right way, so it just has the welt on the upper part, which is a bit funny, but I think these pockets are mostly decorative anyway, and the other one I did the right way. And I think I really learned it now...
My first ever welt!
Here you can see the problem: on the left the correct welt and on the right not...
I also realized I'm gonna run out of thread, so I had to use red that wasn't really matching the fabric with the facings, but it's inside and doesn't show. And once I had pinned all the facings, I realized my pins were the wrong way around, so I get sticking myself with them the whole time I was attaching the facings...

So, most of the things that could go wrong with this cape - did go wrong.

But I also learned a lot. Besides the welt pockets and plaid matching, I also needed to relearn how to sew buttonholes. The actual technique wasn't so much of a problem as much as how to get my machine to do what I want... But I finally got it and they turned out fine. I even had enough thread :)  Well, barely, and I had to use another not quite the same color for the bobbin for the buttonholes, but it doesn't show!

And I learned more about my machine: how to sew the buttonholes, obviously, how to actually read the quick reference chart, and that the pressure of the pressure foot is something you should pay attention to when sewing fabrics that stretch easily out of shape. I used pressure 0 and it was perfect for this fabric. Comparing to what I learned in school, I'm really learning a lot about my machine and how to use it better and it's starting show in the things I do. It's somehow easier to make better looking things when you know how to use the tools you have.

So, finally here are some pictures of the finished cape:

More plaid matching, and here the pockets
look like they are as they should...


I really like the way it flows when you turn :) The fabric is a bit uncomfortable for wear against the bare skin, but that was just for now, when it's too hot for this anyway. But if I ever make another one from a similar fabric (or any kind of cape/jacket), I will definitely line it. I was a bit worried first that I'll look like I was swallowed by a tent, but in the end, I don't think it looks too bad.

I think this is definitely a wearable cape for the winter in Paris! Which is a lot less damp/rainy than the Finnish one and thus more suitable to a wool cape.  And one more thing: This is like the first challenge that I managed to finish on time! Yey for me!

End with a powershot (although it could be more dynamic, but hey, the cape looks good when walking!)
Edit: Check out also my Monthly Stich post!

Friday, August 16, 2013

Sneak Peak: The Cape

Well, I'm trying to find the time to do this. I think this weekend... I have the pattern, I have the fabric, and I have the notions. I'm still making the Milano Cape by Papercut Patterns.

Two weeks ago I did some shopping: Besides the cape fabric, I also got the fabric for the waistband of my circle skirt that should be coming up soon (#sewingdares: circle skirt for dancing) as well as something that would look good as Alma (another #sewingdare: sew a Sewaholic pattern). And finally I got my order from Tissus.net, which means I have elastic for my bombshell swimsuit. That has been long coming, I'll try to make it for the Thread & Needles August vintage challenge (theme: the beach). Some amazing inspiration from other bloggers: View A, the one I'm doing as well: Anna of paunnet, Lauren of Lladybird,  Tasia of Sewaholic, Leila of Three Dresses Project, Katie of Kadiddlehopper, Ginger* of Gingermakes (*not her real name), and Dixie of Dixie DIY, View B/C: Cynthia of Dapperduds (I'm really loving this bikini version), Novita of Verypurpleperson, and Anna of paunnet.

So, hopefully bunch of sewing coming up. The next thing is the cape, though. I saw some amazing wool, but that was 32 €/m, and the pattern requires 3.6m, so I thought: no. But, I found something else on sale. This is still lovely, a bit scratchier than the expensive fabric, but not too bad and this will be for winter so I won't be wearing it on bare skin.
Fabric for the cape + the notions
Don't you think it's lovely? The read is more dark red in real life, it looks a bit orange-y here. I took 4m, so hopefully I can match the stripes, but if I can't, I can't. I will try, though. I don't know if I got enough fabric for matching, as it's a bit new thing for me. But I really love the buttons. I went to a notions shop and just asked what I needed and I showed the fabric and the lady found these. When I first saw them, I didn't think much of them, but when she put them on the fabric, they were awesome.

So, I traced and cut the pattern on yesterday, and I was actually planning to cut the fabric as well. But it was kind of late when I got the pattern done, and I was a bit worried about matching, so I want to do that with a fresh brain... So, I will be cutting today :) I'm also a bit worried about the welt pockets, but you live and learn, right? At any rate, you live.

I did find few tutorials, that I think will be helpful (the written instructions with drawn pictures probably would've worked, but seeing someone do it, helps:


Lladybird's tutorial on welt pockets

I decided to make the pockets from a contrast fabric. Well, I had two that matched the color of my buttons. The problem was: other one is a knit and the other one is cotton, but sort of heavy kind, the kind you would use on furniture or bags or such. After consulting the sewcialists, mainly Angela, I decided to use the cotton. Mainly I think it's nice that outerwear has durable pockets and the heaviness is close to the wool I'm using for the cape. I guess the knit would've worked too. Well, we'll see how well it works.

If you haven't signed up yet for the pattern/book giveaway, do so now!

Friday, August 2, 2013

Monthly Stich: August - The Cape

I'm still thinking I can take on challenges... So I signed up for The Monthly Stich. I think I can do this, though. First, there's one challenge per month, and I don't have to do them all, if I don't have time. Second, the first challenge is for August (the cape challenge), but the next one for September is already announced (vintage pattern). For me the biggest problem with the challenges over the summer were that when I finally got all the supplies, the month had almost gone. Now, I can make sure I have everything before the month begins and I can actually use the challenge month for sewing. Well, I still have lots of other plans, so we'll see what happens, but at least I've been planning on making a vintage pattern anyway. And I think I have the perfect fabric too. But I got kind of excited about the cape too. Especially since the winters in France don't seem to be that cold, so I could actually wear it at least for the next two winters.

Milano Cape by Papercut Patterns
I already ordered a pattern, since I pretty much fell in love with the Milano Cape by Papercut Patterns. They also have a lovely cape/jacket pattern: The Watson Jacket, but since it seems to require more skills, I thought I'd try the easier one first. So I guess I'll be fabric shopping on Saturday... I'm thinking of a wool fabric, which would be nice and warm. And maybe a bright color or chocolate brown or leafy green. Pretty much something from my color palette.

I took my sister fabric shopping last weekend when she was here with her husband and I realized how much choice I have here and how much nicer it's actually to go to a shop where you can feel the fabric and see the colors as they really are, although I haven't really been disappointed when buying from the internet. I also got some nice fabrics on my holiday in Sweden and in Finland, so after this Saturday I think it will be more sewing and less buying. Although, as I've been reading about people stash busting and buying more fabric than they need and I can totally see the problem, but I also think you need a bit of a stash. Especially when you don't live right next to a fabric store. When you have a stash, it means that you can actually start sewing right away, when you find the time and inspiration. This has been a bit of a problem for me. I also don't really have a notions stash, so if the pattern requires a zipper or something, I need to go buy that. What I'm aiming for is, that after Saturday I have everything I need for all my planned stuff. Which is a lot. So, then I can just sew, sew, sew :)

Anyway, this month, there will hopefully be more posts about actual finished garments and I will finally finish some of the challenges I started, but kind of haven't gotten past the material phase.