- Challenge Theme: The Cape Challenge - August 2013
- Pattern used: Milano Cape by Papercut Patterns
Contemporary, sizing: XXS-L (my size: S)
Description by Papercut Patterns: Double breasted cape with six buttons, a flat Peter Pan collar, side single welt pockets and full facings. - Fabric: Wool, bought locally
- Notions: 6 buttons
- Did you make any pattern alterations or design changes?
No changes, except the use of different fabric for the pockets (but this isn't really a change). Unless you of course count the fact that I sew one of the welts upside down. - First worn/Wear again?
First worn for the pictures, this is definitely for the fall/winter. But when the cold weather comes, this will be part of my wardrobe. - Total price: ~36 € + pattern ~22 € = Total ~58 € (The buttons & thread is an estimation: here in France I tend to only get the bank card receipt with the total amount, so no idea what they actually cost. I estimated the cost based on internet stores).
- Time to complete: 14h 30 min
---------------------------------------------------------------------------------------------------------------
Well, the first problem came with the welt pockets: I had totally decided to use the furniture cotton for the pockets. But when I started cutting, I noticed that the knit actually matches the color a lot better than the furniture cotton. So I decided to use the knit after all, since that was the exact right color. But I thought the pockets wouldn't be sturdy enough with the knit, after all, this is outdoor wear for winter. So, what I did was I used the knit for the welt part that shows outside and the furniture cotton for the actual pocket.
The second problem came with cutting: I noticed that I didn't have enough of fusible interfacing. I bought according to the pattern (and even a bit more, since it said 1.3m and I got 1.5), but what I didn't notice was that my fabric wasn't 140 cm wide, but 90 cm... So, some creative solutions: since this wasn't the type you need to iron on, but sew, I decided that it doesn't matter which one is the right side, since they won't show anyway. So, I cut the hem interfacing both the same way. And for the undercollar, there will be a seam in the middle. Since I totally had enough fabric, just not enough for continuous pieces.
And then: the thing I was dreading for: matching the fabric. I was going to use Tasia's method in matching plaids, but my problem (third and I haven't even cut the fabric yet) was, that I couldn't fold the fabric in half as I normally do, since the cape pieces were too big, and I couldn't do it the way it was done in the instructions (you fold the fabric the other way, so that selvedges were on the sides of the fold), because my plaids weren't symmetrical. At this point, I started to wonder if I have enough fabric to match the seams and I decided to try to match the main pieces and then match the collar and facings if possible. Well, in the end, matching wasn't that bad. I matched everything except the hem facings. But I my pieces were a bit stretched out in the process...
But: the plaid matching seemed to work pretty well, as you can see from the picture below :) Well not for the facings, but I was getting tired by then and they don't really matter as they don't show. Also, the only piece that was stretched out was one of the front pieces, so I sewed the buttons on that one, so that it was left under the other piece. And you can barely notice it.
 |
| The back seam: it's not pressed and still you can hardly see where the seam is! |
And then, the first actual sewing thing. The thing I was dreading: the welt pockets. After the youtube tutorial I was quite confident about the sewing of it all, but I really hadn't internalized which way you place the welt, so that it will come out the right way in the end. I even searched the internet before sewing it! But the one that I found where they actually used a garment and not just pieces of fabric for show, was one where they did a bit different kind of welt. So, my first ever welt, even though it wasn't half bad, was upside down... The pocket is sewn the right way, so it just has the welt on the upper part, which is a bit funny, but I think these pockets are mostly decorative anyway, and the other one I did the right way. And I think I really learned it now...
 |
| My first ever welt! |
 |
| Here you can see the problem: on the left the correct welt and on the right not... |
So, most of the things that could go wrong with this cape - did go wrong.
But I also learned a lot. Besides the welt pockets and plaid matching, I also needed to relearn how to sew buttonholes. The actual technique wasn't so much of a problem as much as how to get my machine to do what I want... But I finally got it and they turned out fine. I even had enough thread :) Well, barely, and I had to use another not quite the same color for the bobbin for the buttonholes, but it doesn't show!
And I learned more about my machine: how to sew the buttonholes, obviously, how to actually read the quick reference chart, and that the pressure of the pressure foot is something you should pay attention to when sewing fabrics that stretch easily out of shape. I used pressure 0 and it was perfect for this fabric. Comparing to what I learned in school, I'm really learning a lot about my machine and how to use it better and it's starting show in the things I do. It's somehow easier to make better looking things when you know how to use the tools you have.
So, finally here are some pictures of the finished cape:


 |
| More plaid matching, and here the pockets look like they are as they should... |

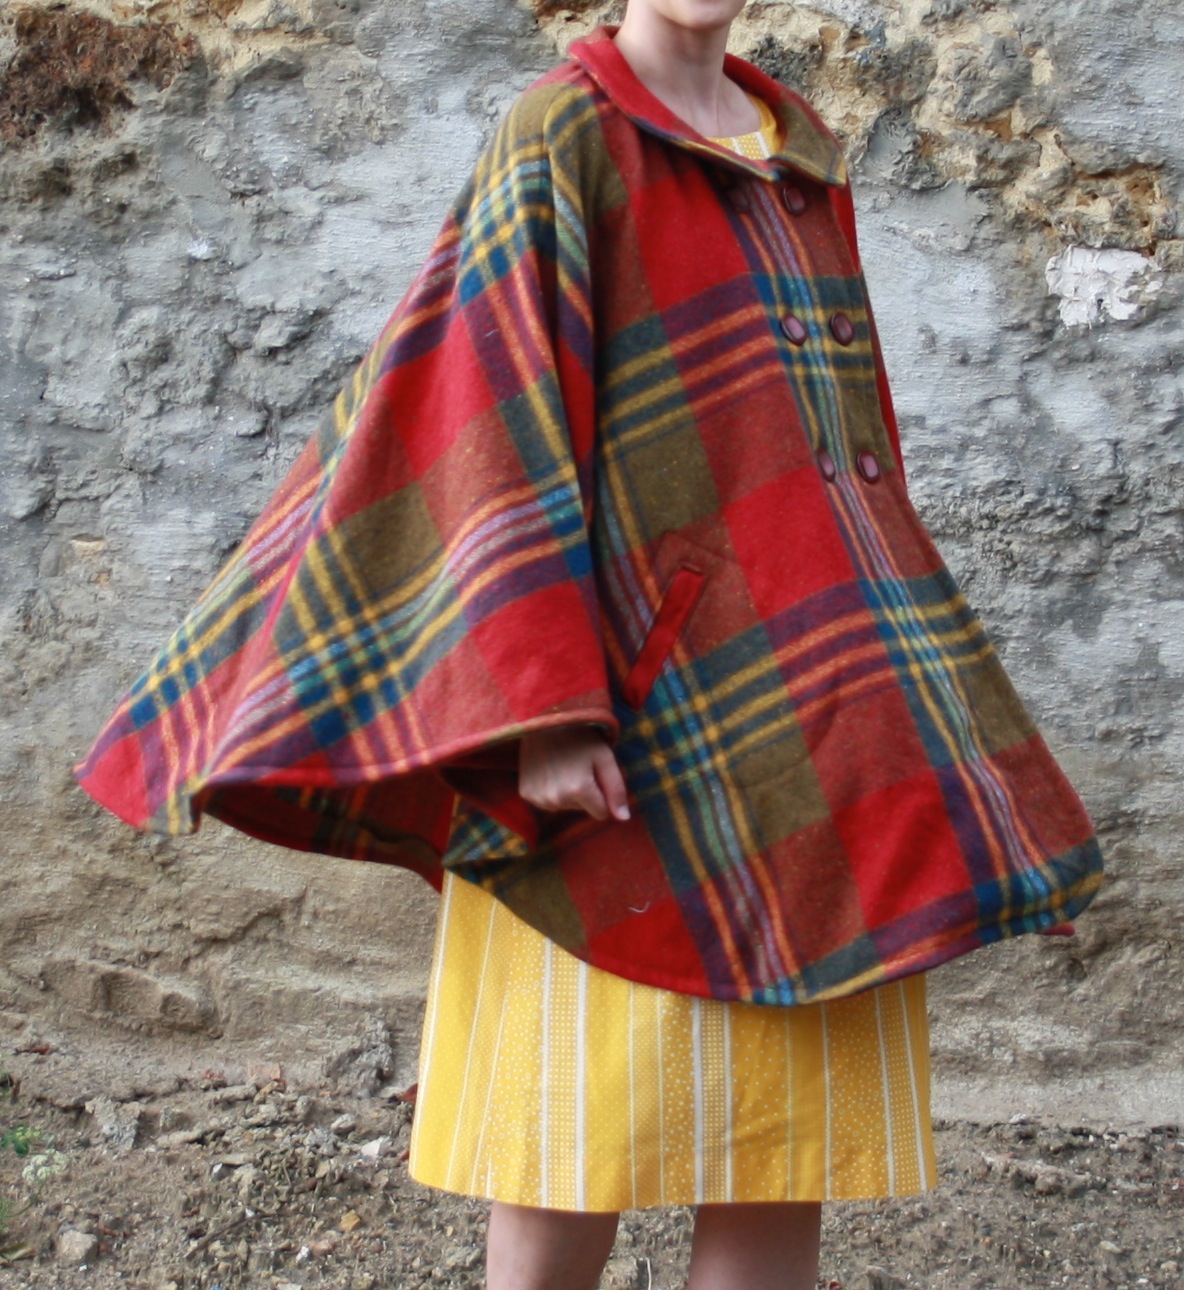

I really like the way it flows when you turn :) The fabric is a bit uncomfortable for wear against the bare skin, but that was just for now, when it's too hot for this anyway. But if I ever make another one from a similar fabric (or any kind of cape/jacket), I will definitely line it. I was a bit worried first that I'll look like I was swallowed by a tent, but in the end, I don't think it looks too bad.
I think this is definitely a wearable cape for the winter in Paris! Which is a lot less damp/rainy than the Finnish one and thus more suitable to a wool cape. And one more thing: This is like the first challenge that I managed to finish on time! Yey for me!
 |
| End with a powershot (although it could be more dynamic, but hey, the cape looks good when walking!) |
This looks so cosy and warm, perfect for the winter. Really want to make a cape so will check this pattern out! I think yours looks great.
ReplyDeleteI LOVE the pattern. All the screw-ups were totally my own. But I learned a lot. And I love that it wasn't a waste of time, since the only thing I wished I'd done is lining it :)
ReplyDeleteAhhhh, I'm in love with your cape!!! Despite your sewing challenges, this came out just beautiful! I put in welt pockets for the first time into a pair of Burda pants (not blogged yet) and I had to have help from a community centre sewing teacher. Not easy, esp. with the burda directions, which appeared to be lacking. And, the checks/plaid??? Lined up beautifully, just like one piece of fabric, great job!
ReplyDeleteThanks! I'm so happy about the matching in the end, although I was really worried about the one stretched piece, but it doesn't show at all. I think I still need to press the cape and then it'll look even better :) And next time (because I'm already thinking a luxury cape from this pattern and from tweed or the expensive wool I saw) I will definitely add lining. Now that this is finished I'm just way too lazy...
ReplyDeleteThis cape looks amazing and well-made!
ReplyDelete